
ComfyUI Extension: ComfyUI-Angelo
Run ComfyUI workflows without the setup
No installs, no CUDA version roulette, no GPU sitting idle on your bill. Bring a workflow and run it in the browser.
Click-to-refine sampler. Generate, then click or paint regions to refine them in place. First-class support for FLUX 2 Klein 9B and Qwen-Image-Edit (Smart Inpaint / Smart Guided Inpaint / Xtra-Fine), works with any sampler-compatible model for Refine + Area Prompt. Optional SAM 3 Detect for text-prompted segmentation, and a companion Overrides node for custom samplers (power-sigma, Flux 2 scheduler, NAG).
README
Angelo
A click-to-edit sampler for ComfyUI. Generate an image, then work it like a photo editor — click or paint to refine regions, drag rectangles or describe locations to inpaint new content, click an edge to outpaint the canvas wider, paint over something to remove it and rebuild the background, auto-detect subjects by naming them and fix them all with one button, pick the best of four variations, and restore anything an edit shouldn't have touched. Pop the whole editor fullscreen for detail work. There's a one-click photo refine too: it rebuilds a soft or low-resolution photo sharp, anchored to the original so it stays the same person and scene — and doubles as upscaling (enlarge in pixel space, then refine the detail back in). Everything outside what you edit stays bit-exact. One node replaces the standard KSampler + ADetailer + MaskEditor + outpaint-pad chain. Works with FLUX 2 Klein 9B and Qwen-Image-Edit as first-class edit models — plus any other sampler-compatible model (FLUX 1, SDXL, SD 1.5). And with two-model workflows you can now generate with FLUX Krea 2 (or SDXL, or anything) and edit with Klein — the hot new generator for the look, the edit model for the control, one canvas (ready-made workflow included).
<a href="https://buymeacoffee.com/lorasandlenses"><img src="https://img.shields.io/badge/Buy%20me%20a%20coffee-FFDD00?style=for-the-badge&logo=buy-me-a-coffee&logoColor=black" alt="Buy Me A Coffee"></a>
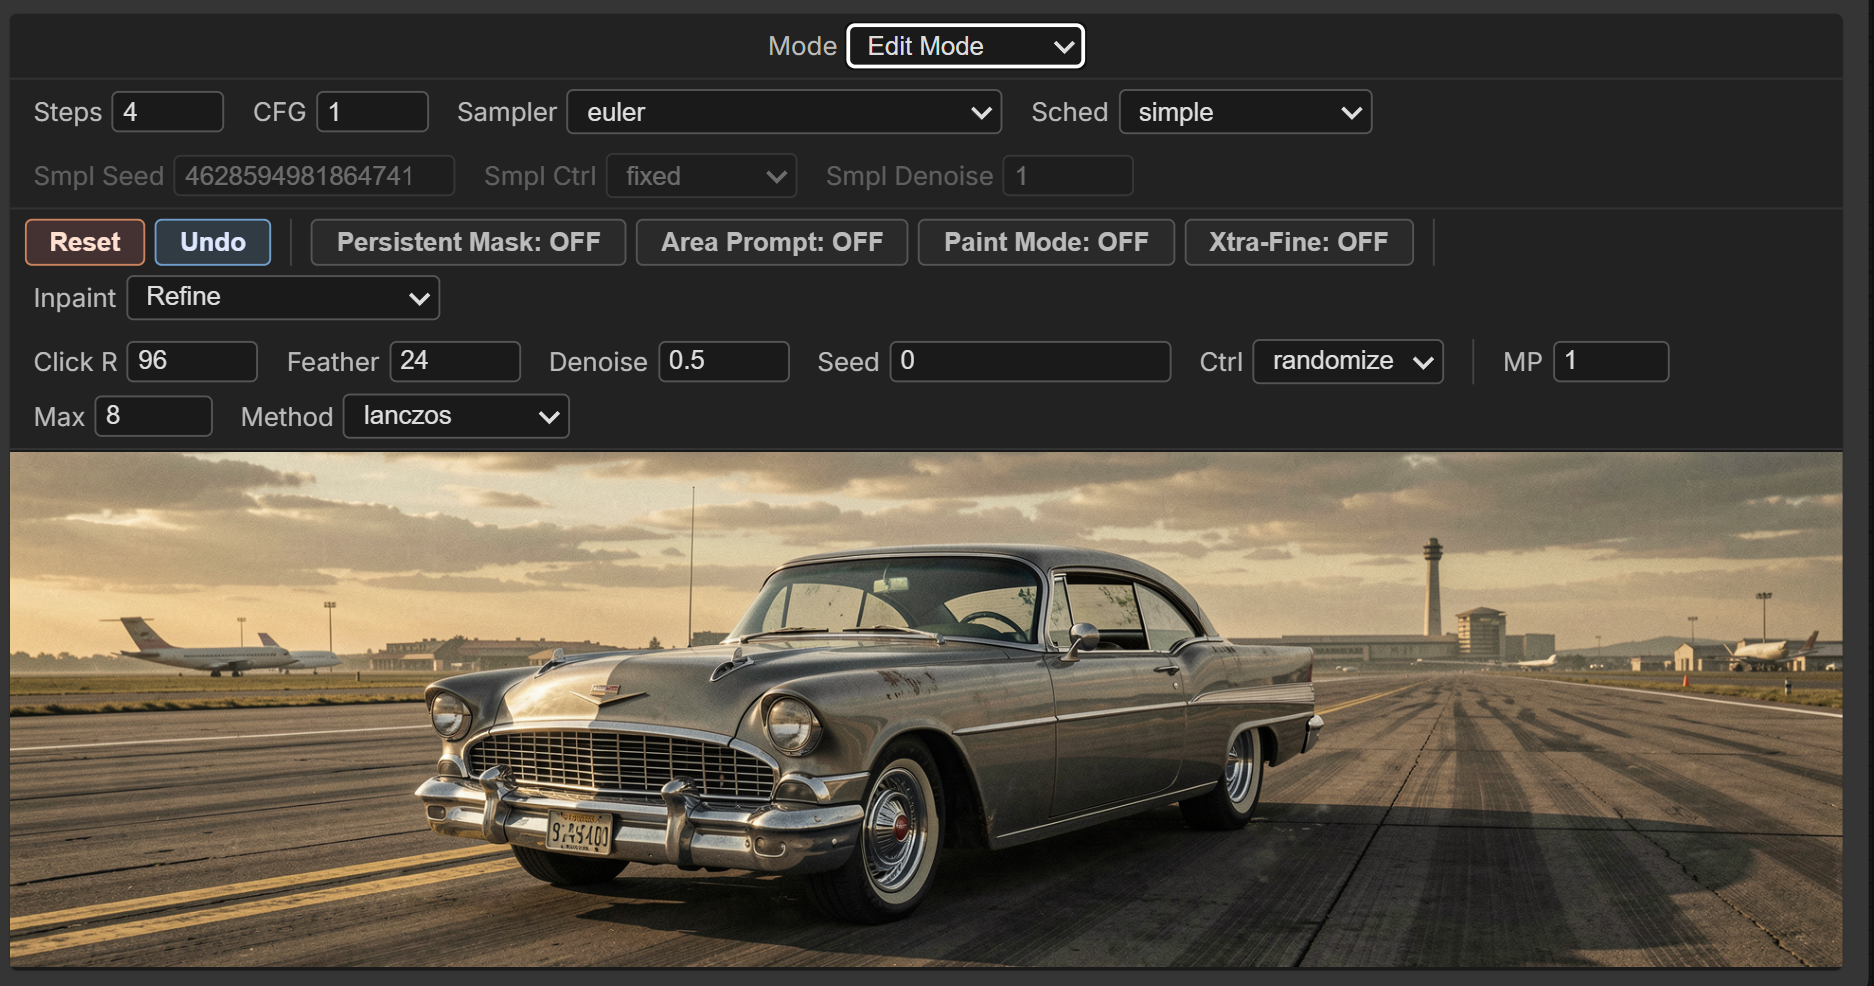
What it does in one screen
                                  ┌─────────────────────────────┐
   Model ──────────►              │     Angelo Node             │
                                  │  ┌───────────────────────┐  │
   Empty Latent ─►                │  │ Mode Steps CFG Sampler│  │  ← gen config row
                   AngeloRefine   │  │ Smpl Seed / Ctrl ...  │  │  ← sampler-seed row
   positive ────►                 │  │ [Reset][Undo] Inpaint▾│  │  ← refine actions
                                  │  │ [Click R][Feather]... │  │  ← refine values
   negative ────►                 │  ├───────────────────────┤  │
                                  │  │ Area Prompt: [______] │  │  ← in-node text box
   vae ─────────►                 │  ├───────────────────────┤  │
                                  │  │                       │  │
   clip ────────►                 │  │   Preview canvas      │  │  ← click / paint / drag
                                  │  │   (fits the node)     │  │
                                  │  └───────────────────────┘  │
                                  └────────────┬────────────────┘
                                               │
                                 image · latent · source_image outputs
That's the entire workflow. No KSampler upstream, no ADetailer downstream, no Image-to-Mask plumbing or outpaint-pad chains in between. Generate, click, done. The image always scales to fit the node — resize the node and the preview tracks it.
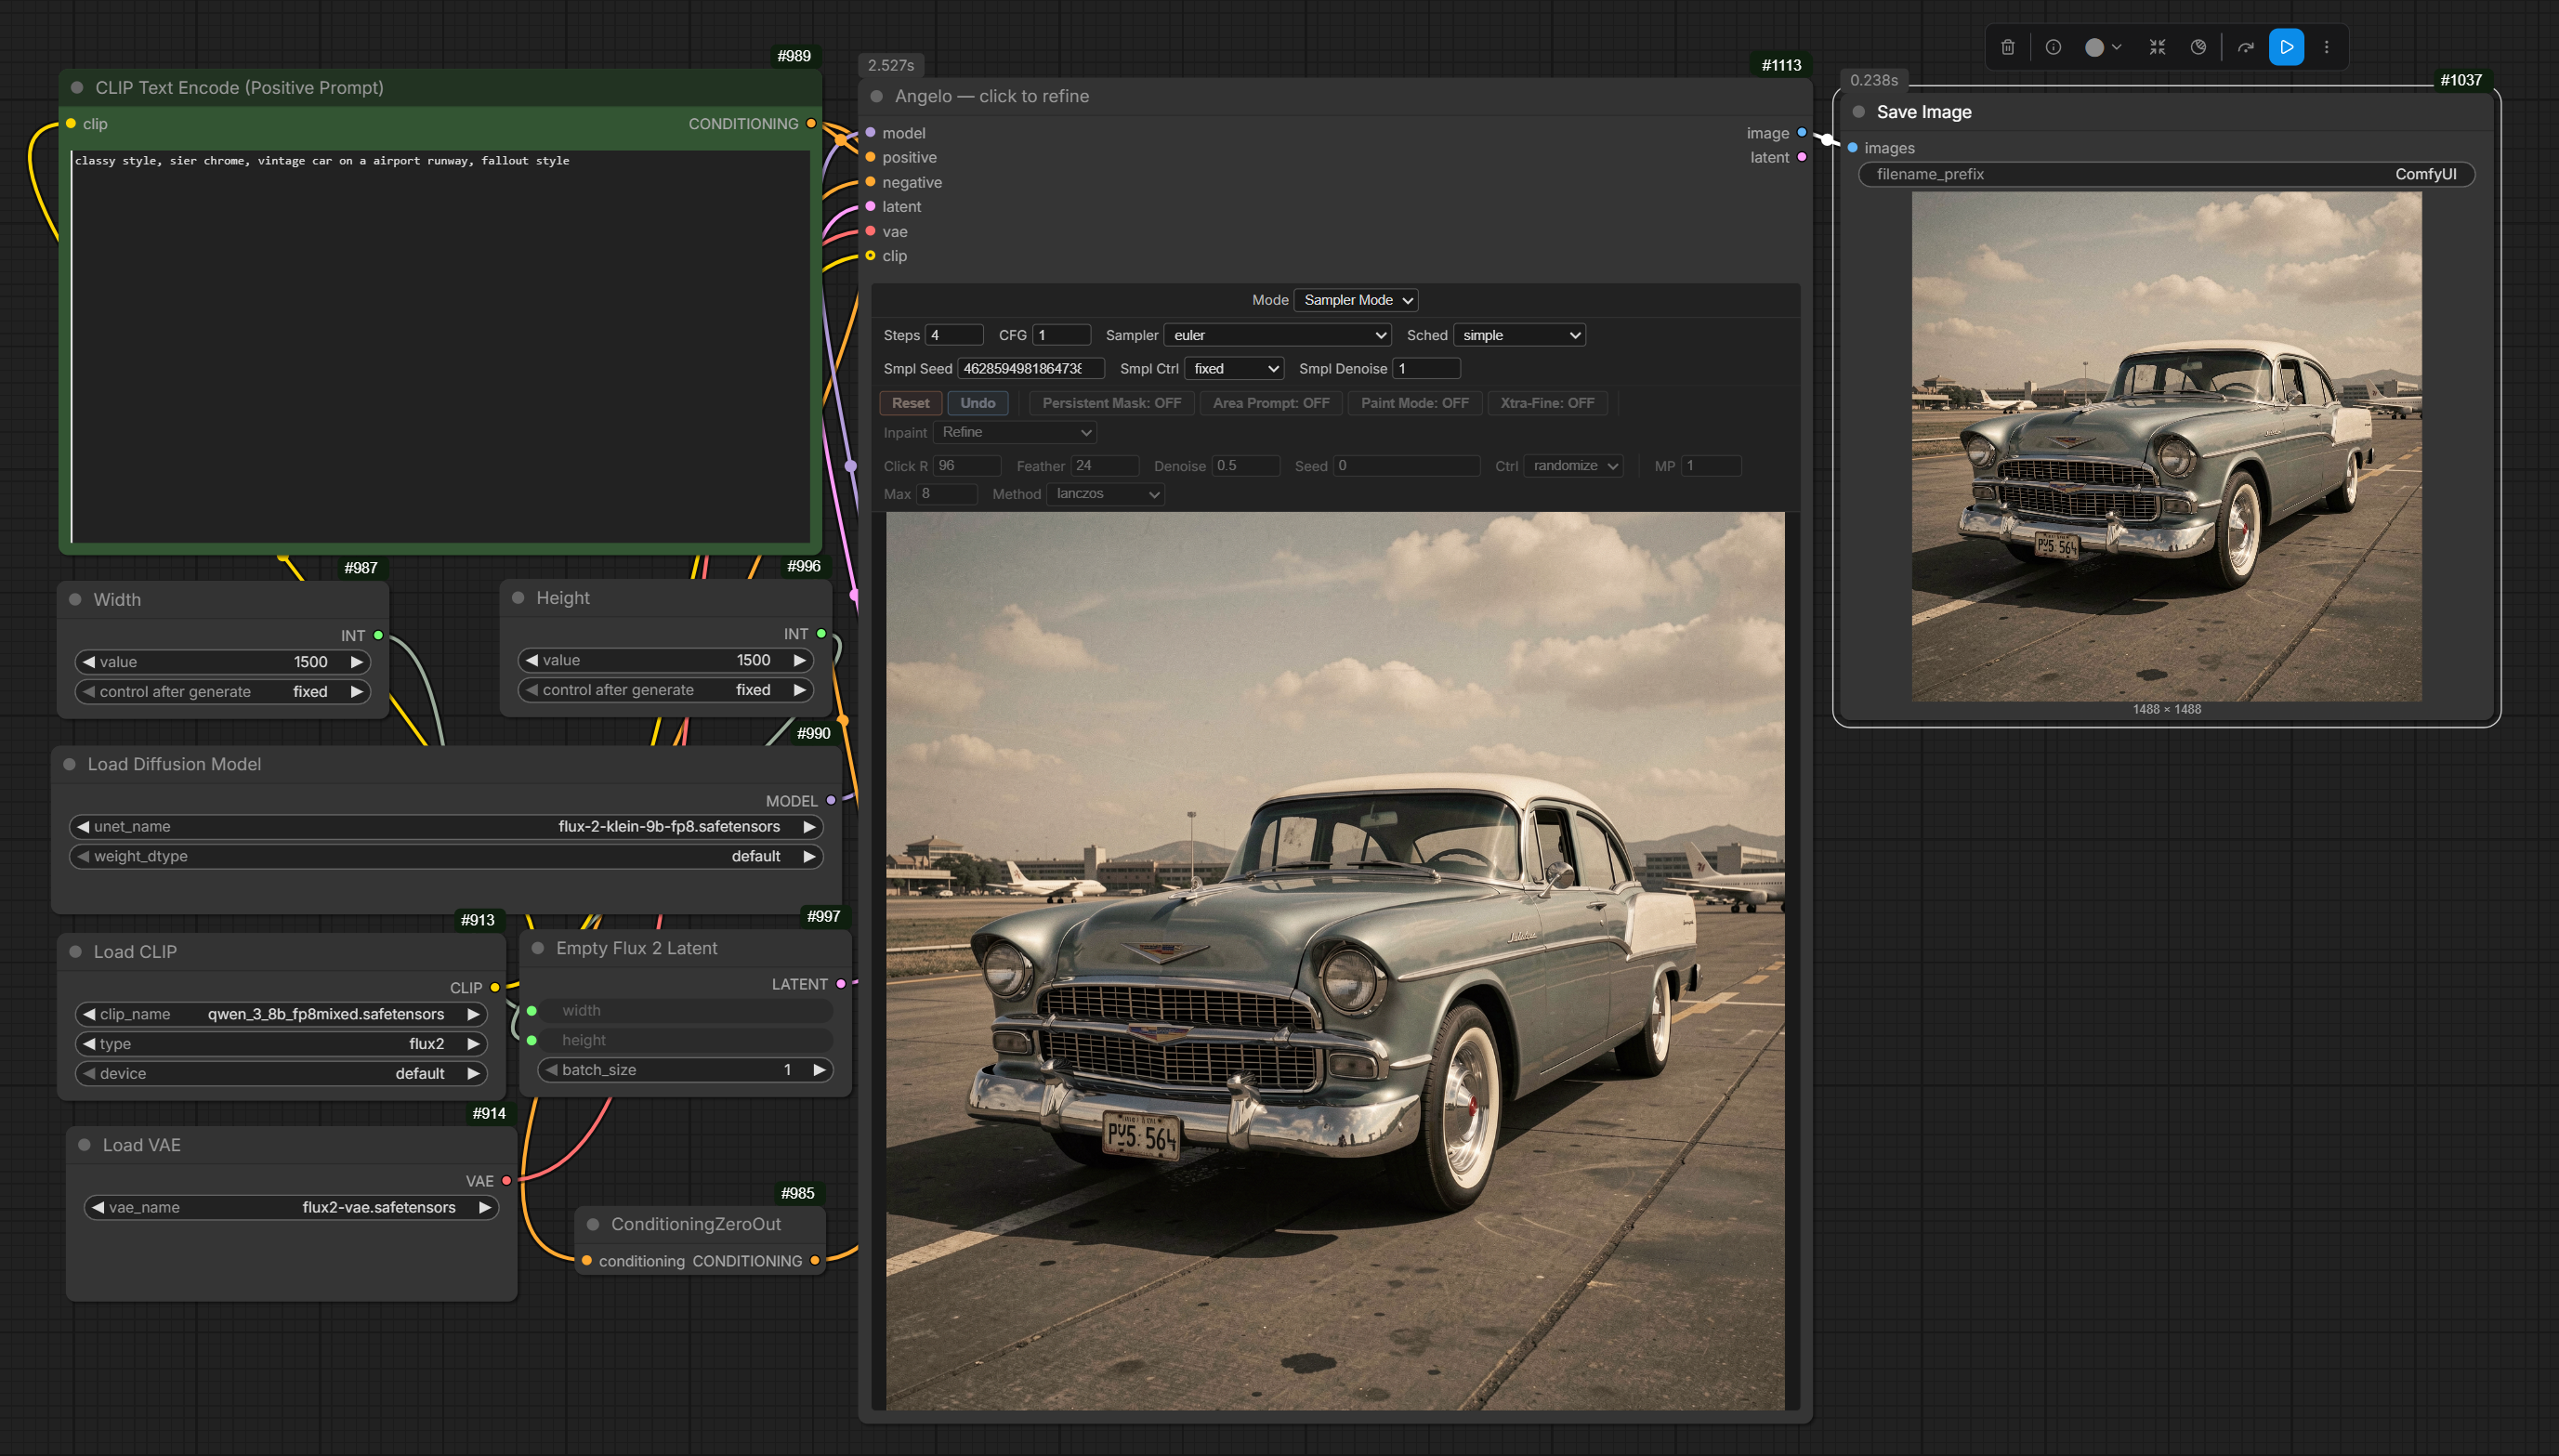
Why you'd want it
ComfyUI's standard "fix the bad hand" workflow is: generate, save the image, open MaskEditor, paint a mask, route the mask + image + a new sampler config back into the graph, re-queue. Want to extend the canvas too? That's another pad node, another mask, another sampler. It works, but it's friction-heavy.
Angelo collapses all of it into one node:
Refine — fix what's there
- Click a region. It refines with your main prompt, in place, immediately.
- Paint a freeform stroke with mouse-down + drag. Same thing but custom shape.
- Type an Area Prompt right in the node to refine a region with a different prompt (e.g. main prompt = "person in forest", area prompt = "detailed photorealistic face") — no second CLIP Text Encode node needed. Six Prompt Slots keep your presets one click away.
- Toggle Xtra-Fine to refine small regions at much higher effective resolution (the ADetailer move, but with full prompt control).
- Reference anchoring for photo restoration — a toggle with a true 0–1 strength dial for how strongly the current image anchors the edit. Load a soft old photo, Reference ON, paint over it, Area Prompt "restore the photo", denoise up to 1.0 — full texture re-render, same person.
- ✨ Quick Photo Refine — or skip the recipe entirely: one button, fixed magic settings (whole image through the Xtra-Fine pipeline, identity-anchored instruction, denoise 1.0, fully anchored). A prompt selector and a Lite toggle sit beside it: the selector picks the instruction (Identity + Quality / Restore Photo / Identity + Colours / Use Area Prompt), and Lite runs the same recipe at a gentler denoise for a lighter cleanup instead of a full rebuild. Load photo, press, done. Each press re-rolls from the original — leave Seed on randomize and mash for genuinely different variations; Undo any pass you don't like.
- ⬆ 2× Pixel and ⬇ Shrink — pixel-space resize, no AI. 2× Pixel enlarges (lanczos); Shrink downscales to a scale factor you pick (area averaging, anti-aliased) with the new dimensions shown before you confirm. To render real detail after enlarging, follow 2× Pixel with ✨ Quick Photo Refine.
Add & extend — put new things in, grow the frame
- Smart Inpaint — drag a rectangle and add brand-new content with an edit model (FLUX 2 Klein 9B or Qwen-Image-Edit).
- Smart Guided Inpaint — no drawing at all: pick a location from a dropdown ("top left", "center", …) + describe what to add, and the edit model places it.
- Outpaint — click near an edge of the preview and the canvas extends that way (or arrows / extend-all for a zoom-out). Anti-duplication smarts built in — continue-the-scene instructions, edge-band references, and a protect brush to keep subjects near the frame edge out of the seam. Every result is reviewed before it commits: Accept, re-roll it, or walk away free.
Automate — let Angelo do the clicking
- Detect a region by describing it (optional SAM 3) — type "the face", click the highlight, and it masks the silhouette for you. No painting. Nudge the mask in/out, or Shift/Alt-drag to touch it up by hand.
- ⚡ Fix All — detect "face" in a group shot, hit one button, and Angelo works through every face automatically — each at Xtra-Fine quality with your Area Prompt, each individually undoable. ADetailer's pitch, but visible, stoppable, and prompt-controlled.
- Vary ×4 — re-roll with four dice: generate four variations of your last edit at once and click your favourite from a 2×2 chooser. Nothing commits until you pick.
Stay in control — a real editor's safety net
- Re-roll the last edit with a fresh seed on the same mask + original image, or toggle Persistent Mask to keep evolving a region over repeated Queues.
- Restore brush — toggle Restore and paint to heal a region back to the original image, instantly (no sampling). The Lightroom "erase part of an edit" gesture: refine a spacesuit, then brush the face inside the helmet back to how it was.
- 🩹 Remove brush — toggle Remove and paint over an object (or Detect it, or click) to erase it and have the edit model rebuild the background behind it. It cuts the region out of the reference the model anchors to, so it continues the surroundings instead of redrawing the object — no ghosting. See Remove brush for how it works.
- Hold
\over the preview for an instant before/after flash of the original base (Lightroom's compare key). - ⛶ Fullscreen — pop the whole editor out to a full-screen canvas for precise detail work; every tool keeps working, Esc returns it.
- Undo / Redo to step back and forward through your refines.
- Load Image to edit an existing photo directly in the node — no Empty Latent +
VAEEncodechain to wire (you still connect thevaeinput as normal; Angelo does the encode itself). Or just drag-drop an image file onto the node; right-click the preview to copy it or open it in a new tab. source_imageoutput emits the original pre-edit base, ready to wire straight into a compare node.
Two models, one canvas
- Gen bundle — generate the base with whatever model nails the look (FLUX Krea, SDXL, anything), then do all the click-to-edit with Klein or Qwen-Image-Edit. One extra node carries the second model; Angelo hands the pixels across automatically. See Two-model workflows.
All in one node. All without re-queueing the whole workflow manually for each fix.
Model compatibility
Angelo treats FLUX 2 Klein 9B and Qwen-Image-Edit as its two first-class edit models — both get the full feature set, including the Smart inpaint modes. It also works with any other sampler-compatible model: FLUX 1, SDXL, SD 1.5, and standard checkpoints (for Refine, Xtra-Fine, and Area Prompt — the Smart modes need an edit-trained model).
And you don't have to choose: the gen bundle on the Overrides node lets a non-edit model handle the base generation (they're often the better-looking generators) while an edit model handles everything after — see Two-model workflows.
Two latent layouts are handled transparently. Standard 4D models (FLUX, SDXL, SD) use [B, C, H, W] latents. Temporal / video-derived models (Qwen Image Edit, Wan) use 5D [B, C, T, H, W] latents — their VAEs carry an extra frame axis. Angelo normalises latent shape at a single VAE boundary and feeds each model the dimensionality it expects before sampling (the same step ComfyUI's stock KSampler does), so you don't need a model-specific latent node — wire model, vae, and clip as usual.
For the Smart inpaint modes, use an edit-trained checkpoint — FLUX 2 Klein 9B or Qwen-Image-Edit (not plain Qwen-Image, which has the reference code path but isn't trained for it; see Inpainting Mode). Refine (incl. Xtra-Fine and Area Prompt) works on any model. The Reference anchor (photo restoration) also needs an edit model to have an effect. Outpaint works on any model too, but is best on the edit models — they get an edge-band reference and follow the continue-the-scene instruction, which is what keeps extensions in-style and subjects un-duplicated.
Install
Clone into your ComfyUI/custom_nodes/:
cd ComfyUI/custom_nodes/
git clone https://github.com/shootthesound/ComfyUI-Angelo.git
Restart ComfyUI. No additional Python dependencies for the core node. (The optional Detect feature adds SAM 3 — see Detect for its one-time opt-in installer.)
Quick start
FLUX 2 Klein 9B distilled
Just want it running? ComfyUI auto-lists this under Workflow → Browse Templates → ComfyUI-Angelo (the example_workflows/ folder), or drag example_workflows/Klein9b-example.json onto the canvas — it's a complete FLUX 2 Klein 9B graph (UNet / CLIP / VAE loaders → Angelo → Save Image) wired and ready. Point the loaders at your model files and queue.
To wire it from scratch instead:
- Add the Angelo — click to refine node from the
sampling/Angelocategory. - Wire it up:
model← Load Checkpoint / FLUX model loaderlatent← Empty Latent Imagepositive/negative← CLIP Text Encode nodesvae← Load VAE / your VAE sourceclip← your CLIP / text encoder (optional, but required for the in-node Area Prompt and the Smart modes). Wire the same CLIP that feeds your CLIP Text Encode nodes.
- Defaults are tuned for Klein 9B distilled:
steps=4,cfg=1.0,sampler=euler,scheduler=simple. All sampler/generation settings live in the node's toolbar (no native widget rows). Adjust for other models. - Mode defaults to Sampler Mode. Queue the workflow — Angelo generates the base image.
- Flip Mode to Edit Mode (top-left of the toolbar). The refine controls un-grey; cursor becomes a crosshair.
- Click a region on the preview. Angelo refines that spot.
That's the loop. Click → refine → click → refine. Undo if needed. Reset to start over from the cached base.
Qwen-Image-Edit
Just want it running? ComfyUI auto-lists this under Workflow → Browse Templates → ComfyUI-Angelo, or drag example_workflows/Qwen Edit 2511 example.json onto the canvas — a complete Qwen-Image-Edit 2511 graph wired to Angelo. Point the loaders at your model files and queue.
To wire it from scratch, do it exactly the same way as Klein — model / vae / clip / positive / negative — but point the loaders at a Qwen-Image-Edit checkpoint, its VAE, and its text encoder. There's no Qwen-specific latent node to add; Angelo normalises the latent shape internally.
Qwen-Image-Edit isn't distilled like Klein, so adjust the toolbar generation settings to suit it — typically more steps and CFG > 1 (or a low-step Lightning / Lightx2v LoRA if you run one, which lets you drop back toward 4–8 steps at CFG ≈ 1). Everything else is identical: Sampler Mode to generate, then Edit Mode for Refine / Xtra-Fine / Area Prompt / Smart Inpaint / Smart Guided Inpaint.
Two-model workflows — generate with anything, edit with Klein
Edit models are brilliant editors but not always the prettiest generators. The gen bundle fixes that: wire a second, generation-focused model into the Angelo — Overrides node (gen_model / gen_positive / gen_vae, plus its own gen_steps / gen_cfg / gen_sampler_name / gen_scheduler settings) and Sampler Mode generates the base with that model — then hands the pixels to your main edit model for the whole editing session. Best of both, one canvas.
Just want it running? Drag example_workflows/Krea_plus_Klein-workflow.json onto the canvas (also listed under Workflow → Browse Templates → ComfyUI-Angelo) — FLUX Krea 2 (with its turbo LoRA, 8 steps at CFG 1) generates a 1504×1504 base, FLUX 2 Klein 9B does all the editing. Note the gen-side VAE choice: Krea 2 works best with the Wan 2.1 VAE, which is what the example wires into gen_vae. It includes an optional LLM prompt-expansion side-chain; if ComfyUI flags any missing nodes, install them via Manager or just delete that side-chain and type your prompt directly. See the gen bundle under Toolbar for the full wiring rules.
The two modes
Sampler Mode
Angelo acts as a normal sampler — generates the base image from the incoming latent. The refine control rows are greyed; canvas clicks do nothing. The generation config row (Mode / Steps / CFG / Sampler / Sched) and the Sampler-seed row stay active here:
- Mode — flip between Sampler / Edit.
- Smpl Denoise — denoise level for the base gen (1.0 = full regenerate from noise, like a normal KSampler).
- Smpl Seed + Smpl Ctrl — seed value + after-generate control (
fixed/randomize/increment/decrement).
When you flip Mode to Edit Mode, Smpl Ctrl auto-locks to fixed and Smpl Seed snaps to the seed that actually produced the cached image (preserves it across the mode switch). The Sampler-seed row greys out in Edit Mode.
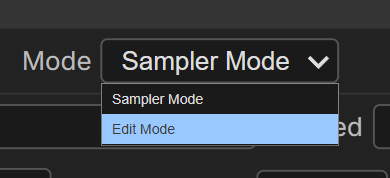
Edit Mode
The refine control rows come alive. Click, paint, or drag on the preview to refine, depending on the Inpaint mode.
Cursor changes by mode:
- Crosshair = single-click refine (Refine) or rectangle drag (Smart Inpaint)
- Cell = paint mode active (drag to draw a freeform stroke, Refine only)
- Default arrow = Smart Guided Inpaint (no canvas interaction — driven by the location dropdown + Generate button)
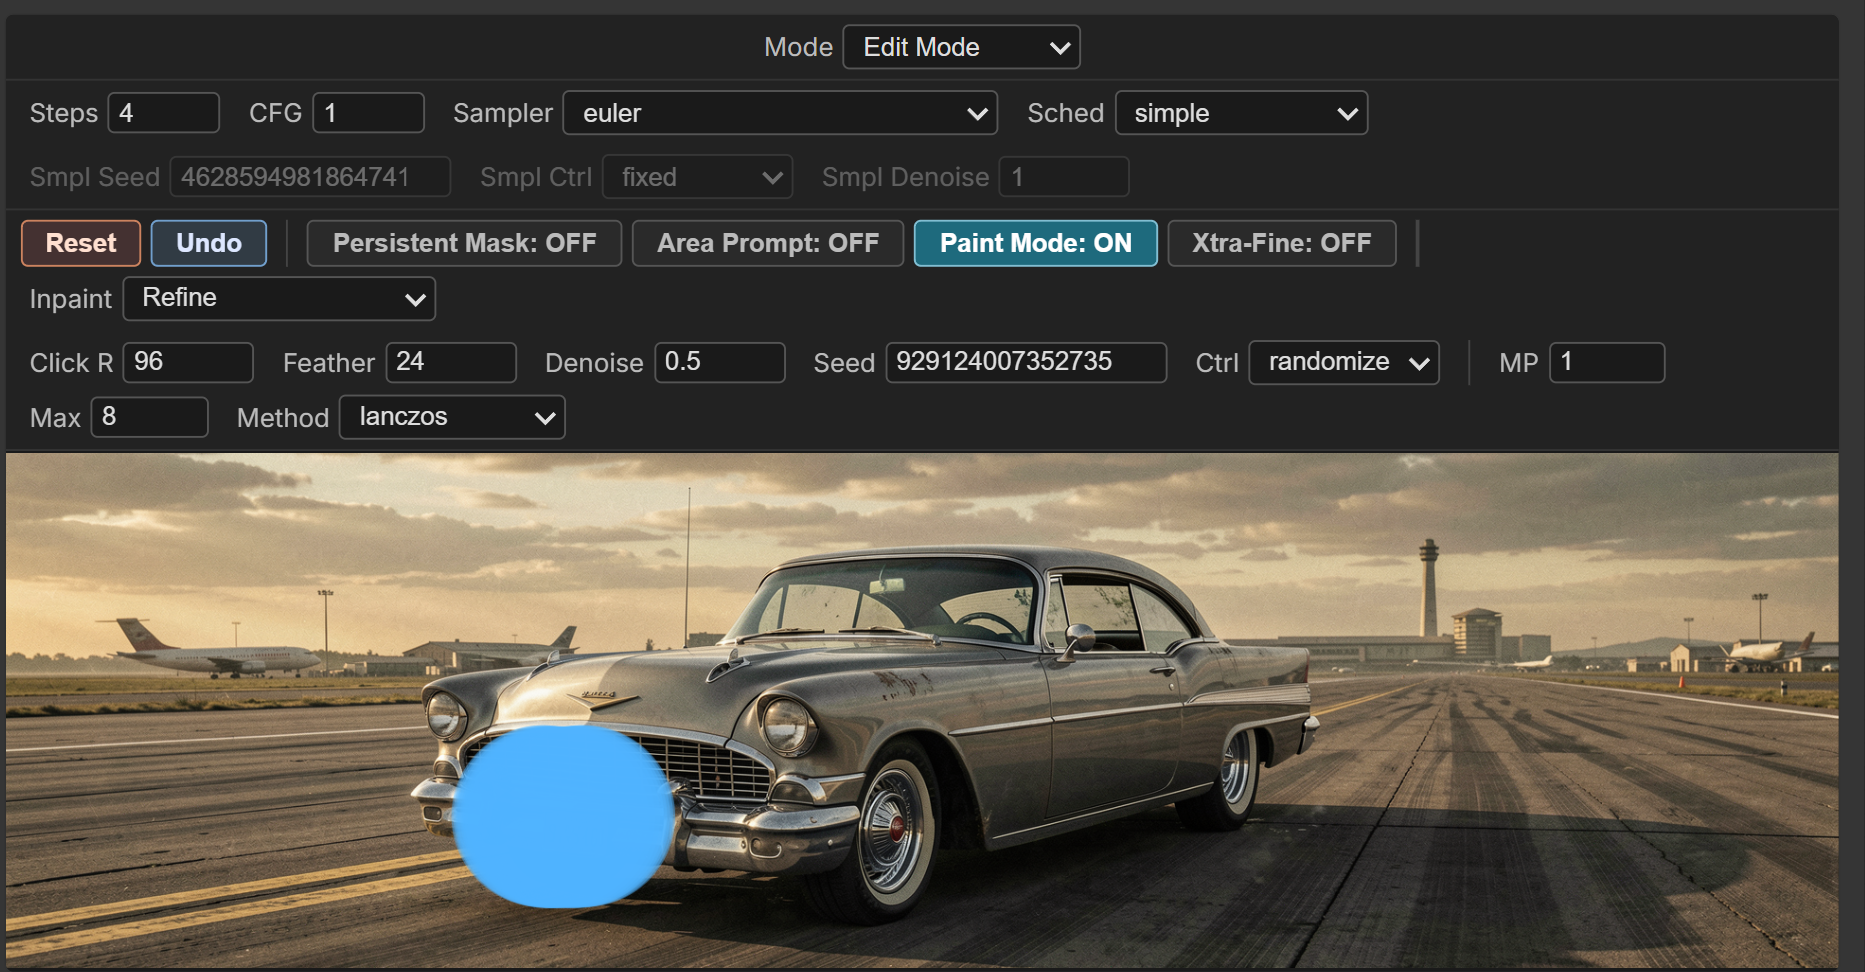
Paint Mode lets you brush a freeform region to refine instead of single-circle clicks:
Load Image (edit an existing photo)
Want to edit a photo rather than something you generated? Hit 🖼 Load Image in the toolbar, pick a file, and it becomes the base — no Empty Latent or separate VAEEncode node to wire. The latent input is optional; Load Image is all you need.
Still wire the
vaeinput as normal. Angelo encodes the loaded photo (and decodes previews) with it — it just does the encode internally, so you don't need a standaloneVAEEncodenode feedinglatent.
On load you're asked how to size it:
- Keep current resolution — encode the photo as-is.
- Resize to X MP — scale to a target megapixel (good for taming huge phone photos / saving VRAM).
Either way the dimensions are rounded to a multiple of 16 so any supported VAE is happy. The node then VAE-encodes the photo with the wired vae, installs it as the base, and switches to Edit Mode so you can click / paint / inpaint straight away.
Notes:
- Reset and Undo return to the loaded photo (it's the base).
- While an image is loaded, the
latentinput is ignored. Hit ✕ Unload (appears next to Load Image while one is loaded) to clear it and hand the base back to the wired latent. - The base is in-process state, so a ComfyUI restart clears it — but Load Image re-encodes from the uploaded file, so re-loading is one click.
Using Angelo as a standalone image editor
Heads-up on how ComfyUI runs things: any Angelo action — Load Image, a refine click, a paint stroke — triggers ComfyUI's normal queue, which re-executes every output node on the canvas plus anything with a randomised seed. That's a ComfyUI behaviour, not something a custom node can opt out of (there's no "run just this node" API). So if you've got a sampler set to randomize or other Save Image chains hanging around, they fire on every edit too — which feels slow.
If you're using Angelo to edit existing images, keep it snappy by running it on a minimal graph — Load Checkpoint / loaders → Angelo → Save Image — or mute / bypass (Ctrl+M) the other generation chains while you edit. Then a load or click only runs Angelo and its loaders (which are cached), and nothing else re-fires.
Toolbar
The toolbar holds everything — there are no native widget rows. Top to bottom, grouped into a centred Mode switch, a generation block, and an edit block:
      [🖼 Load Image]  Mode: [Edit ▾]             ← top row, centred (always active)
  [Steps] [CFG] [Sampler ▾] [Sched ▾]            ← shared generation config (always active)
  [Smpl Seed] [Smpl Ctrl ▾] [Smpl Denoise]       ← base-gen seed (greys in Edit Mode)
 ─────────────────────────────────────────
  [Reset] [⟲⟳] [Re-roll] [Vary ×4] | [Persistent Mask] [Area Prompt] [Paint Mode] [Restore] [Xtra-Fine] [Reference·str] | [Inpaint ▾]
  [Click R] [Feather] [Denoise] [Seed] [Ctrl ▾] | [MP] [Max] [Ctx Pad] [Method ▾]  ← edit block (greys in Sampler Mode)
  [⛶ Outpaint: ← ↑ ↓ → All | Amount Overlap]                                       ← appears in Outpaint mode only
  [✦ Quick Actions: ✨ Quick Photo Refine  [prompt ▾] [Lite] | ⬆ 2× Pixel | ⬇ Shrink]  ← one-press magic buttons
The Mode switch sits centred up top, with 🖼 Load Image beside it (both work in either mode). Below them, the generation block (always active, base-gen seed greys in Edit Mode); below the divider, the edit block (greys entirely in Sampler Mode). Toggle buttons show their state by lighting up when ON — no ON/OFF text. The Xtra-Fine values (MP / Max / Ctx Pad / Method) appear only while Xtra-Fine is ON. Every control has a hover tooltip. Quick reference:
Mode + generation block
| Control | What it does | |---|---| | Mode ▾ | Sampler Mode (generate the base) vs Edit Mode (click/paint/drag to refine). Centred at the top of the node | | ▶ Queue | The in-node twin of ComfyUI's main Queue button — same code path, so everything (including Persistent Mask re-runs) behaves identically, but you never have to leave the node or fullscreen to press it. Sampler Mode: generate the base; Edit Mode: re-execute the graph (Persistent Mask loops, upstream changes) | | Steps / CFG / Sampler ▾ / Sched ▾ | Sampler config, shared by base gen and refines. Klein 9B distilled: 4 / 1.0 / euler / simple. Qwen-Image-Edit: more steps + CFG > 1 (or a low-step Lightning LoRA) | | Smpl Seed / Smpl Ctrl ▾ / Smpl Denoise | Seed, after-generate control, and denoise for the base generation (Sampler Mode) |
Driving Steps / CFG / Sampler / Scheduler from elsewhere in the workflow. If you'd rather have a single source of truth for those four values across your workflow than set them again on Angelo's toolbar, drop an Angelo — Overrides node (same sampling/Angelo category), set the fields you want to drive (leave others at -1 / (toolbar) to fall through), and wire its overrides output into Angelo's overrides input slot. Per-field opt-in: override only steps, only cfg, any combination. Anything left at its sentinel uses the toolbar value as normal.
The Overrides node also carries disable_live_preview — flip this ON if ComfyUI's global latent preview (Settings → Preview method = Latent2RGB / TAESD) is rendering into the Angelo node mid-sample and squashing the editor area. It suppresses the preview callback for this Angelo only, so KSampler etc. elsewhere in your workflow keep their previews.
Generate with one model, edit with another (the gen bundle). The Overrides node's gen_model / gen_positive / gen_negative / gen_vae inputs carry a second, generation-only model stack. When wired, Sampler Mode generates the base with the gen model using the node's gen_steps / gen_cfg / gen_sampler_name / gen_scheduler settings, decodes it with gen_vae, and re-encodes the pixels with your main edit VAE — so every edit after that runs on the edit model exactly as if the image had come in via Load Image. Edit Mode never touches the gen bundle; leave it unwired and nothing changes. The wiring rules:
gen_positivemust be encoded with the gen model's own CLIP — conditioning isn't portable across model families, so you'll have two text-encode chains: one into Angelo'spositive(edit model), one into the pipe (gen model).gen_negativeis optional — unwired, Angelo uses a zeroed copy ofgen_positive(same as ConditioningZeroOut).- Size Angelo's wired
latentfor the gen model (a plain Empty Latent Image for SD-class models). It sets the output resolution via the gen VAE's ratio — the console prints the resolution each run so a mis-sized latent is easy to spot. A latent from the wrong model family raises a clear error rather than sampling garbage. - Seed and Smpl Denoise stay on Angelo's toolbar — the seed randomize/fixed control works as normal, and Smpl Denoise below 1.0 gives you img2img with the gen model, even off a loaded image.
- gen_model + gen_positive + gen_vae are all-or-nothing; partial wiring raises a clear error in Sampler Mode instead of silently using the wrong model.
A ready-made example lives at example_workflows/Krea_plus_Klein-workflow.json — FLUX Krea 2 generating, FLUX 2 Klein 9B editing.
Full custom sampler control (power-sigma, Flux 2 scheduler, NAG-Extended, custom guiders). The Overrides node exposes three more optional slots — guider / sampler / sigmas — for replacing the whole sampler stack rather than just renaming pieces of it. Wire any GUIDER node (CFGGuider, BasicGuider, NAG variants, etc.), any SAMPLER (KSamplerSelect and friends), and any SIGMAS source (BasicScheduler, KarrasScheduler, PolyexponentialScheduler, power-sigma nodes, the Flux 2 scheduler) into those three slots. When all three are wired Angelo runs through guider.sample(...) instead of comfy.sample.sample(...) — the toolbar's steps/cfg/sampler_name/scheduler become moot, but the Denoise slider still applies (sigmas are tail-sliced per call, same as ComfyUI's SplitSigmasDenoise). Partial wiring (e.g. only sampler) silently falls back to the default. The implementation borrows three helpers from @KursatAs's customSampler branch — full credit there, including the device-safe wrapper that fixes a CPU/GPU collision in ComfyUI-NAG-Extended's inpaint path.
Edit block — actions + toggles
| Control | What it does |
|---|---|
| Reset | Discard cached refinements + history, start fresh from the Sampler-Mode base |
| ⟲ / ⟳ (Undo / Redo) | Pop the most recent refine off the history stack (up to 10 deep) / re-apply the one Undo removed. A new edit clears the redo history. Button-only (no Ctrl-Z/Y — those clash with ComfyUI's graph undo) |
| Re-roll | Redo the most recent edit with a fresh seed on the same mask + same starting image, replacing the last attempt — cycle seeds on one edit without reset → re-mask → rerun. Works for click / paint / rectangle / detected masks. After a ✨ Quick Photo Refine it re-runs the ✨ pass instead (same as pressing ✨ again) — it always re-rolls the last thing you did |
| Vary ×4 | Re-roll's big sibling: generate four variations of the most recent edit at once (same mask, same starting image, four seeds), then click your favourite in a 2×2 chooser overlay. The pick replaces the last attempt; ✕ / Esc keeps the current result — nothing commits until you choose |
| ✨ Quick Photo Refine (+ prompt ▾, Lite) | One-click photo restoration with a fixed recipe: the whole image runs through the Xtra-Fine pipeline (1.3MP working target — small images get supersampled, refined, composited back) at denoise 1.0, reference anchor 1.0 — identity stays, texture re-renders. The prompt selector beside it picks the instruction (Identity + Quality / Restore Photo / Identity + Colours / Use Area Prompt); the Lite toggle runs the identical recipe at a gentler denoise (0.8) for a lighter cleanup that stays closer to the input. Ignores every toolbar box except Seed, and each press re-rolls from the original (not the last result), so randomize + mash gives real variations. Auto-tiles on canvases over ~1.6MP. Edit models + CLIP; Refine mode only. See "Photo restoration" |
| ⬆ 2× Pixel | Pure pixel-space 2× upscale — lanczos, no AI, deterministic and instant. Decodes, enlarges 2×, re-encodes, and commits immediately as the session's new base (dimension change, so history resets, like loading a new photo). Nothing is invented. Pair it with Quick Photo Refine to render detail in afterwards |
| ⬇ Shrink | Pure pixel-space downscale — no AI. A popup shows the current size, a scale factor (with 75/50/33/25% presets), and the new dimensions (snapped to /16) before you confirm; resampling is area averaging (anti-aliased, the right method for shrinking). Commits as a new session base (dimension change, history resets). Refine mode only |
| Persistent Mask | Hold the last mask, then hit Queue repeatedly (ComfyUI's button or the in-node ▶ Queue) to keep refining that region on the latest result — each press builds further, so you can gradually morph it (pair with Ctrl=randomize). For variations on the original image instead, use Re-roll. Locked OFF in Smart Guided Inpaint (no mask) |
| Area Prompt | Refine with the Area Prompt text typed in the box above the canvas (encoded with the connected CLIP) instead of the main prompt. Requires a CLIP input + non-empty text. The box only appears when this is ON. Forced ON in both Smart modes |
| Paint Mode | Hold + drag to paint a freeform stroke as the mask, instead of single-circle clicks (Refine only) |
| Restore | When ON, clicks / strokes / Detect masks restore the painted region back to the session's original base — a feathered latent blend, no sampling, instant. Bring back details an edit shouldn't have touched. Refine only |
| 🩹 Remove | When ON, clicks / strokes / Detect masks erase the painted object and rebuild the background behind it — the region is cut out of the reference the edit model anchors to (a real hole), so it continues the surroundings instead of redrawing the object. Always full denoise on the Xtra-Fine crop path (auto-enables Xtra-Fine; restores it on OFF); Feather forced 0, mask auto-grows ~10%; Denoise box + main/Area prompt ignored. Edit models only; Refine only; mutually exclusive with Restore. See "Remove brush" |
| Reference (+ strength box) | Anchor refines to the current image. When ON, a strength box appears beside it: a true 0–1 blend — every step mixes the reference-anchored prediction with the free one at that ratio (0.6 = 60% anchored; 1 = fully anchored). Lets Denoise run high (0.7–1.0) without losing the subject — the photo-restoration dial. In-between values run a second positive pass per step (slightly slower; 1.0 costs nothing). Leave OFF when the Area Prompt wants to change the region (anchoring fights changes). Quick Photo Refine ignores this entirely (it has its own fixed recipe). Refine only; needs an edit model |
| Xtra-Fine | Crop the painted region, upscale via VAE + image upscale, refine at high effective resolution, composite back. ADetailer-style. Forced ON in Smart Inpaint, OFF in Smart Guided Inpaint |
| Inpaint ▾ | Refine / Smart Inpaint / Smart Guided Inpaint / Outpaint. See "Inpainting Mode" below |
Edit block — refine values
| Control | What it does |
|---|---|
| Click R | Pixel radius for single-click refines + brush size in Paint Mode |
| Feather | Pixel-space gaussian feathering on the mask edge for smooth transitions. Defaults to 15 (and is adjustable) in Smart Inpaint for a soft blend; disabled in Smart Guided Inpaint |
| Denoise | How much trajectory to run on the refine (0.3 = subtle, 0.6 = real redo, 0.9+ = regenerate). Locked to 1.0 in both Smart modes |
| Seed + Ctrl ▾ | Seed for the refine pass + after-generate control. Defaults to randomize so each refine is a fresh variation |
| MP | (Xtra-Fine only) Target megapixels for the refine pass |
| Max | (Xtra-Fine only) Hard cap on linear upscale factor (8× linear = 64× area) |
| Method ▾ | (Xtra-Fine only) Pixel-space upscale method. Default lanczos. |
Xtra-Fine (the killer feature)
Standard refine runs the model on the full latent. The mask only decides where output is written; the model sees the whole image as context. That's great for general refinement but it means a small region (a face, a hand) is only ~64 latent units wide — well below where FLUX renders detail well.
Xtra-Fine does what ADetailer does, but inside the same Angelo loop:
- Compute the painted-mask bbox + a context-padding band of surrounding pixels for context.
- VAE-decode the cached latent to pixels.
- Crop the pixel image to that padded bbox.
- Upscale the crop in pixel space to hit
MPmegapixels (capped atMaxlinear scale). - VAE-encode the upscaled crop → high-resolution latent.
- Refine just the painted shape inside it via the standard noise-injection inpaint path.
- VAE-decode, downscale, composite back into the cached pixel image.
- VAE-encode the composited image AND blend with the cached latent using the mask as alpha — so the unaltered regions stay bit-exact (no VAE round-trip drift).
The result: a face that was 64 latent units gets refined at ~1000 latent units (depends on MP + Max). The model finally has room to render fingers, eyes, teeth correctly.
Pair with Area Prompt for a workflow Lightroom users will recognise: paint a region, type "detailed photorealistic face" in the Area Prompt box, click. Same image, that region transformed at full quality with the override prompt.
When to use Xtra-Fine — and the size floor
Rule of thumb: if the thing you're improving is small, turn Xtra-Fine ON. A distant face, an eye, a hand, jewellery, text on a sign — anything that occupies only a small slice of the frame. In plain Refine those pixels map to just a handful of latent cells and the model has no room to render detail; Xtra-Fine crops them out and enlarges them to a full working canvas (the MP target, default ~1 MP ≈ 1024²) before refining, then composites back. For large regions plain Refine is already fine and faster.
Mind the VAE size floor. The VAE downsamples by 16× on FLUX 2 (8× on FLUX 1 / SDXL / SD 1.5), so the region the model actually works on needs enough latent cells to encode meaningful detail. Practical guidance:
- Aim for the refined region to land at roughly 512–1024 px on its short edge after the Xtra-Fine enlarge. On FLUX 2 that's ~32–64 latent cells — enough for coherent detail. The default
MP≈ 1024² gets you there for most paints. - The enlarge is capped at
Maxlinear scale (default 8× = 64× area). So an extremely tiny paint can't be blown up without limit: a ~40 px region maxes out around ~320 px even at 8×, which is near the floor and will look soft. Paint a little wider (or raiseMax) so the crop — and the VAE — have room to work. - Below ~256 px effective working size, expect mush: there simply aren't enough latent cells for the model to put detail into, no matter the prompt.
In short: Xtra-Fine is what makes small fixes possible at all, but it can't conjure resolution from nothing — give it a crop that enlarges to a few hundred pixels minimum.
Re-roll vs Persistent Mask (iterating on a region)
Two complementary ways to keep working a region without re-masking:
Re-roll (button, next to Undo) redoes your most recent edit with a fresh seed on the same mask and the same starting image, swapping the result in place of the last attempt. Mash it to cycle seeds on one edit until you like a result — it doesn't stack on top of itself. Works for click, paint, rectangle and detected masks. (It does this by popping the last attempt, so Undo afterwards still steps back through your history as expected.)
Persistent Mask (toggle) holds the last mask; each press of the standard ComfyUI Queue button re-runs it on the latest result, so the region builds further every time — use it to gradually morph something into something else over several presses:
Ctrl=randomize+ Queue, Queue, Queue → a varied walk, each step building on the lastCtrl=fixed+ Queue, Queue, Queue → push the same direction deterministically
A new click while Persistent Mask is on commits a new region to keep building from.
Vary ×4 (button, next to Re-roll) is Re-roll with four dice: it generates four variations of your most recent edit in one go — same mask, same starting image, four different seeds — and overlays a 2×2 chooser on the preview. Click the one you like and it replaces the last attempt; hit ✕ or Esc and the current result stays, at zero cost (nothing was committed). On a 4-step distilled model like Klein the four passes take just a few seconds total. Conditioning is encoded once and shared across the passes, so it's cheaper than four separate re-rolls.
In short: Re-roll = "try this edit again on the original"; Vary ×4 = "show me four tries, I'll pick"; Persistent Mask = "keep evolving from where I am now."
Restore brush (heal back to the original)
Sometimes an edit is 90% right and 10% collateral damage — you refined a spacesuit and the face inside the helmet changed too. Before, fixing that meant exporting to Photoshop and masking by hand. Now:
- Toggle Restore ON (the amber button next to Paint Mode).
- Click or paint over the part you want back.
- That region snaps back to the session's original base image — instantly.
No sampling runs at all: Restore is a feathered blend in latent space (mask × original + (1−mask) × current), so it costs milliseconds, not a model pass. Everything outside the painted region stays bit-exact.
Notes:
- Feather applies — use it for a soft transition between restored and edited content, exactly like the refine masks.
- Works with single clicks, Paint Mode strokes, and Detect masks — detect "the face", click the highlight, and the face is healed back in one go.
- "Original" means the session base: the Sampler Mode generation, or the photo you loaded via Load Image. Reset and Undo use the same anchor.
- It pushes a normal history entry, so Undo / Redo step through restores just like refines.
- Refine mode only. The Smart modes generate new content, so "restore to base" has no meaning there — the toggle dims.
- Pair it with hold
\(see Keyboard shortcuts) to flash the original first and see exactly what you'd be bringing back.
Remove brush — erase an object
Paint over something you don't want and Angelo erases it, rebuilding the background behind it. It's the sibling of the Restore brush — same gesture, opposite job: Restore brings the original back, Remove makes the object gone.
- Toggle 🩹 Remove ON (next to Restore).
- Paint over the object (or single-click, or Detect it — e.g. "the person" — and it uses that mask).
- The region is regenerated as background.
How it avoids ghosting. Naively telling a model to "remove the object" tends to leave a faint copy of it — the surrounding context implies it's there. Remove sidesteps that: it cuts the masked region out of the reference the edit model anchors to (a genuine hole in the reference latent), so the model has nothing to reproduce there and instead continues the surrounding scene. This is the same idea as the Outpaint protect brush, which excludes a region so it isn't repeated. A fixed background-fill instruction drives the pass, never your main prompt (that would draw scene content back into the hole).
Fixed behaviour, so there's nothing to tune:
- Always full denoise, on the Xtra-Fine crop path — turning Remove on auto-enables Xtra-Fine (and shows Ctx Pad / MP / Method); the removal runs on a high-res crop, which is what rebuilds fine background detail. Turning Remove off restores Xtra-Fine to how it was.
- Feather is forced to 0 and the mask auto-grows ~10% to cover the object's halo (a tight mask leaves a rim of the original behind).
- The Denoise box and your main/Area prompt are ignored — the fill instruction and the crop reference do the work.
- Edit models only (FLUX 2 Klein 9B / Qwen-Image-Edit — they have the edit branch this needs). Refine mode only; mutually exclusive with Restore. Undo / Re-roll / Vary ×4 all work.
Tips. Shadows and reflections aren't under the brush — paint those too, or they'll give the removal away. If a removal leaves a small artifact, turn Remove off and clean it with the regular brush (Paint Mode, Refine mode, a gentle Denoise ~0.6) to smooth it without regenerating the whole area.
Photo restoration (✨ Quick Photo Refine + the Reference dial)
Got a soft, noisy, or low-quality photo? The fastest path is one button:
✨ Quick Photo Refine (in the edit row, Refine mode only). A true magic button with its own fixed recipe: one press runs the whole image through the Xtra-Fine pipeline (1.3MP working target — smaller images are supersampled to it, refined, composited back) at denoise 1.0, fully anchored to the current image as a reference (strength 1.0) — identity stays, texture re-renders. Two controls sit beside the button — a prompt selector and a Lite toggle. The selector picks the instruction:
- Identity + Quality (default) — "Keep the identity from image 1. make the image high quality." (Qwen-Image-Edit automatically gets its own tuned variant: "lightly restore this old photo, remove dust and scratches, improve sharpness and contrast, preserve original feel").
- Restore Photo — "Keep the identity from image 1. restore the photo." — for damaged or old photos.
- Identity + Colours — adds a colour hold for images whose palette must not move.
- Use Area Prompt — your own text from the Area Prompt box drives the pass (falls back to the default if the box is empty).
Lite runs the identical recipe at a gentler denoise (0.8 instead of 1.0): it re-renders less and stays closer to the input — a lighter cleanup rather than a full rebuild. Reach for it when the photo is already decent, or when the full pass changes more than you want.
No other toolbar box affects Quick Photo Refine — the selector and Lite are its only knobs; Denoise, Reference, and the rest are ignored. Only the Seed applies, and each press re-rolls from the original image, not the previous result — so leaving Seed Ctrl on randomize and mashing the button gives genuinely different restorations instead of converging on one, with Undo stepping back through them and \ comparing to the original. Load photo → press → done. (Want different numbers? That's what the manual recipe below is for.)
Want control over the prompt, the strength, or the region (restore just part of a photo)? The manual recipe underneath it is the Reference dial:
- Load Image (or drag-drop) the photo.
- Reference ON (right of Xtra-Fine) — a strength box appears beside it; 0.8–1.0 for restoration.
- Paint over the area to restore — or the whole image with a big Click R.
- Area Prompt: "restore the photo" (slot it for reuse). Phrase it as an instruction — edit models are instruction-trained, and in testing the plain instruction beat every descriptive variant ("sharp, high-quality photograph"-style prompts and keep-the-colours constraints all lost to it).
- Denoise 0.7–1.0. Queue.
Why Reference matters: in plain Refine, the subject's identity lives entirely in the partially-noised latent — so real enhancement (high denoise) destroys the person along with the noise, and you're stuck nibbling at 0.3. With Reference ON, an edit model (FLUX 2 Klein / Qwen-Image-Edit) anchors identity and content from the reference image through its edit branch instead — denoise can run high, the texture gets fully re-rendered (which is where the quality actually comes from), and the subject stays the subject. The value is a true blend: at every sampling step the anchored prediction and the free prediction are mixed at your ratio — 1.0 holds identity hardest, ~0.5–0.7 trades some anchoring for extra texture freedom. (In-between values evaluate both predictions per step, like CFG does for the negative — slightly slower, and worth it.) Tune to taste per photo.
Resizing: ⬆ 2× Pixel and ⬇ Shrink
Two pixel-space resize buttons on the Quick Actions bar, both no AI — just deterministic resampling. They change the canvas size and commit as a new session base (history resets, like loading a fresh photo).
⬆ 2× Pixel enlarges — decode, lanczos 2×, re-encode. Nothing is invented or re-rendered; it just makes the canvas bigger. To put real detail into the larger canvas, follow it with ✨ Quick Photo Refine (which auto-tiles on the now-large canvas — see "Working at 4MP+" below) or a spot edit with Xtra-Fine.
⬇ Shrink downscales. A popup shows the current size, lets you pick a scale factor (with 75 / 50 / 33 / 25 % presets or a custom value), and shows the resulting dimensions (snapped to a multiple of 16) before you confirm. Resampling is area averaging — the right method for shrinking: it averages the discarded pixels so it anti-aliases, where lanczos (great for upscaling) can ring on heavy reduction. Handy for bringing a huge canvas back down for export, or trimming a 2× that went bigger than you needed.
The surprise win — diffusion super-resolution with zero extra models. Because Quick Photo Refine re-renders the whole image anchored to itself, it doubles as a reconstruction step. Load a small, low-quality photo at a deliberately large size — use Load Image's "Resize to" to bring a 0.3MP snapshot in at 1.5–3MP, where it arrives soft and blurry — then press Quick Photo Refine. The pass rebuilds it sharp at the new size, anchored to the original: same person, same scene, real texture, no banding even on a huge latent. It's the SUPIR / Magnific idea (degrade, then reconstruct), but riding the edit model's own reference branch instead of a bolt-on upscaler — no ControlNet, no tile model, nothing extra to download.
Working at 4MP+. Angelo never samples a latent beyond ~1MP: Quick Photo Refine auto-tiles on canvases over ~1.6MP (overlapping tiles + a dual offset grid that erases the seams), and Xtra-Fine crops every spot edit — so the node stays fast at any canvas size. Plain whole-canvas refines (a giant brush stroke with Xtra-Fine off) do sample the full latent — expect them slow and softer at 4MP; reach for Xtra-Fine, or run Quick Photo Refine (optionally in Lite) over the whole thing instead.
The fine print:
- It anchors. That's the whole point — and it means Reference ON fights any Area Prompt that wants to change the region ("smiling", "eyes open"). Restoration ON, reshaping OFF.
- With Xtra-Fine ON, the reference is the upscaled crop — so the small-region restoration (a face in an old group photo) gets both the resolution boost and the identity anchor. This combination is the strongest move in the node for old photos.
- Verify with hold
\(before/after) and claw back any drifted detail with the Restore brush — the three tools were made for each other. - Local restoration tiles; a whole-image identity change does not. Quick Photo Refine's >1.6MP tiling path is for rendering detail into known-good content. If you point Use Area Prompt at an actual semantic change (swap a face, change the person), Quick Photo Refine runs it as a single whole-image pass instead of tiling — a semantic edit has to see the whole canvas at once, or you get a half-changed subject with seams.
- Non-edit models (SDXL, FLUX 1) ignore the reference — the toggle is harmless but does nothing there. Quick Photo Refine, however, is NOT harmless on non-edit models: with the reference ignored, a high-denoise full-canvas pass simply regenerates the image. Undo brings it back, but the button is for edit models.
Inpainting Mode (Refine / Smart Inpaint / Smart Guided Inpaint / Outpaint)
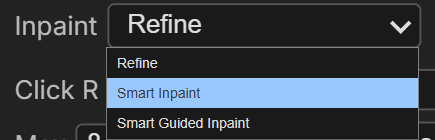
Three options for how a region is treated. The two Smart modes need an edit-trained model (FLUX 2 Klein 9B, Qwen-Image-Edit, etc.) and a wired CLIP. They work by injecting reference_latents, so a base text-to-image checkpoint (e.g. plain Qwen-Image, not the Edit variant) will produce colour-distorted output — it has the reference code path but its weights were never trained for it. Use the Edit variant for Smart Inpaint / Smart Guided Inpaint; Refine works on any model.
| Mode | What it does | Use for |
|---|---|---|
| Refine (default) | Painted/clicked region is the starting state — the model partially denoises the existing pixels per the denoise level. Mask is a click circle or a paint stroke. | Face/hand fixes, polish, style adjustments, editing what's already there |
| Smart Inpaint | Drag a rectangle (click + hold one corner, release at the opposite). Locks denoise=1.0, Xtra-Fine=ON, Area Prompt=ON. Injects reference_latents so an edit model's edit branch activates, then zeros the masked latent so the region regenerates from full noise. | Adding new content in a specific drawn region |
| Smart Guided Inpaint | No painting or boxes. Pick a location from a dropdown ("Top left", "Center", "Bottom half", …); it's prepended to your Area Prompt at run time (e.g. "In the top left of the image, a red car") and the edit model places it across the whole image. Locks denoise=1.0, Xtra-Fine=OFF, Area Prompt=ON; press Generate Guided Edit to run. | Adding new content when you don't want to draw — quick, coarse placement |
| Outpaint | Extend the canvas. Arrow buttons or click near a preview edge; every result goes through a review overlay (Accept / Try again / Cancel) before anything commits. Accepting installs the new canvas as a fresh session base — history resets. See "Outpaint" below. | Growing the image — wider scene, taller sky, zoom-out |
Why Smart Inpaint exists
An edit model like FLUX 2 Klein or Qwen-Image-Edit has no concept of a mask — it takes a reference image + a prompt and produces an edited image. The painted shape only constrains where the result is composited, not what the model generates. Smart Inpaint addresses this by (a) cropping to the dragged rectangle so the model's working region is the area you care about, (b) injecting that cropped region as reference_latents so the edit branch sees the local context (the reference is the crop only — never the whole image), and (c) zeroing the masked latent so the model fills it as new content rather than refining what was there.
Typical "add a person on the road" workflow:
- Inpaint Mode: Smart Inpaint (auto-locks denoise=1.0 / Xtra-Fine=ON / Area Prompt=ON)
- Drag a rectangle roughly where the person should go — make it generously larger than the subject so the body isn't clipped at the rectangle edge
- Type the Area Prompt (the box appears above the canvas):
"a person walking, full body, realistic, matching the scene's lighting" - Queue
Rectangles beat tight silhouettes here: the composite keeps only what lands inside your shape, so a person-shaped mask clips any body part the model drew outside it. A generous rectangle gives the model room to compose a complete subject.
Example — drag a rectangle over the wheel, prompt "wheel engulfed in flames", run:
Smart Guided Inpaint — placement by words, not boxes
The same edit-model plumbing as Smart Inpaint, but the spatial "where" comes from a dropdown + prompt phrasing instead of a drawn region. There's no mask at all — the whole image is edited, with reference_latents keeping the rest faithful and the location prefix telling the model where to put the new content.
- Inpaint Mode: Smart Guided Inpaint
- Pick a Location from the dropdown above the Area Prompt box (corners, middles, center, edges, halves, top/bottom)
- Type what to add in the Area Prompt box
- Press Generate Guided Edit
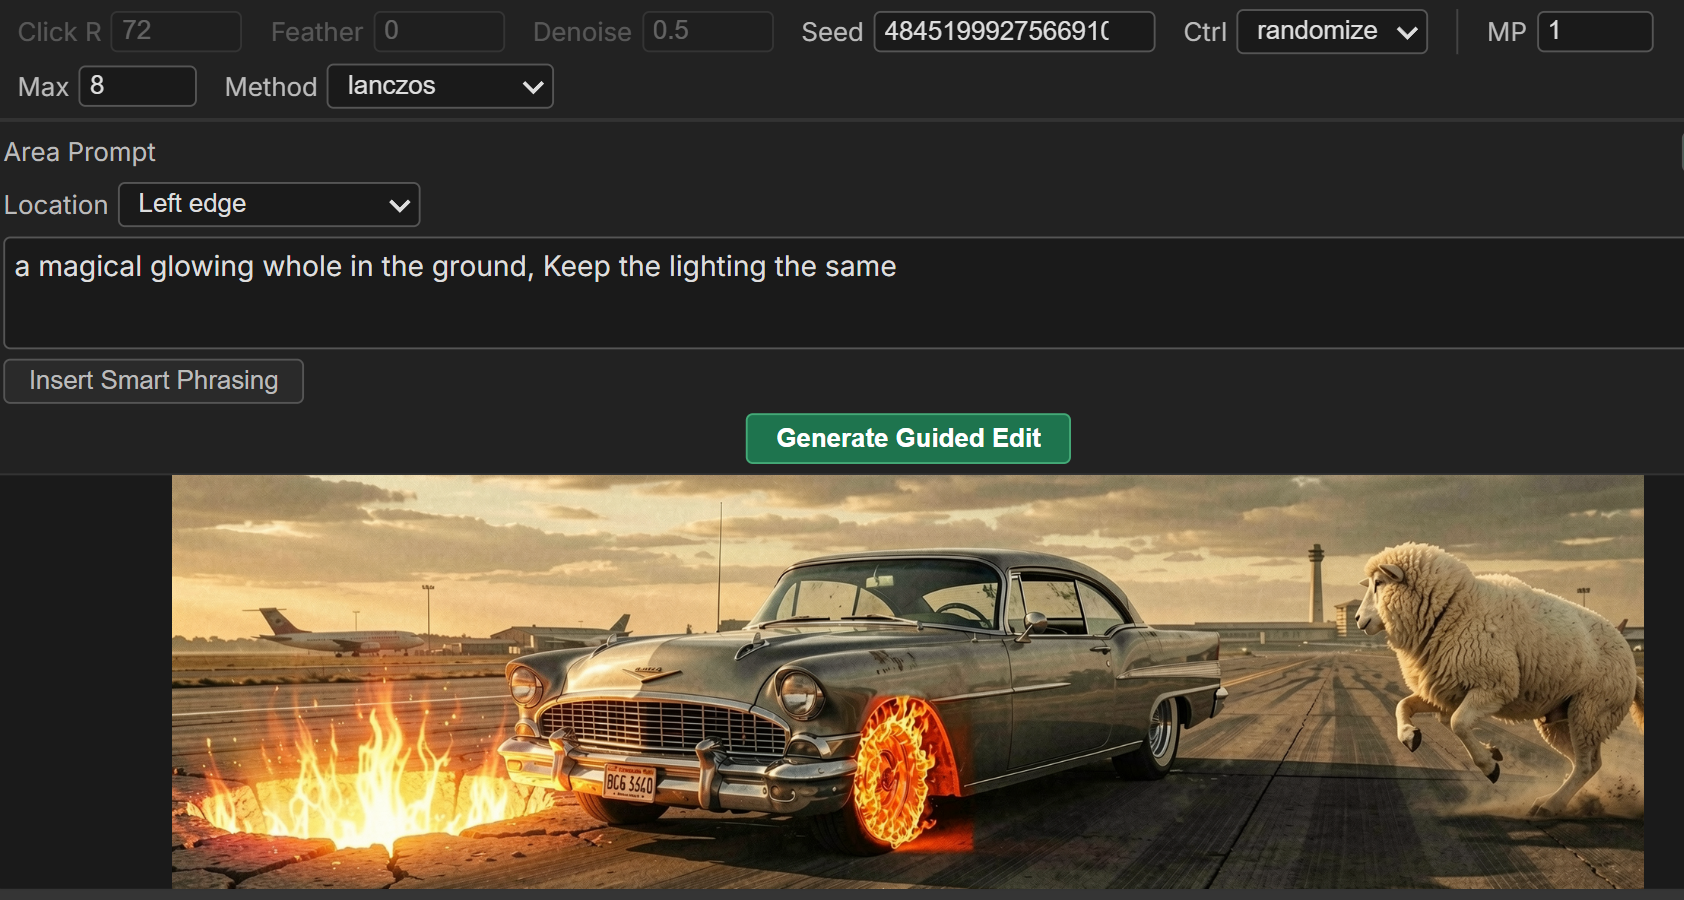
Example — Location Right edge, prompt "A sheep jumping up and down", hit Generate Guided Edit:
Honest expectations: text-based placement is fuzzy by nature. Coarse regions ("top half", "bottom of the image", "center") land most reliably; fine ones are looser. FLUX 2 Klein and Qwen-Image-Edit honor these phrases well in practice. Use Smart Inpaint when you need precise placement, Smart Guided when you want a quick, no-draw edit.
Insert Smart Phrasing (a button under the Area Prompt box, shown in both Smart modes) opens a popup of edit-preservation constraints — keep the lighting / pose / clothes / faces the same — and appends the ticked ones to your Area Prompt. Handy for keeping the rest of the subject stable while changing one thing.
<table> <tr><td align="center"><b>Tick the constraints</b></td><td align="center"><b>Appended to the Area Prompt</b></td></tr> <tr><td><img src="screenshots/smart-phrasing-popup.png" width="400" alt="Insert Smart Phrasing popup"></td><td><img src="screenshots/smart-phrasing-applied.png" width="400" alt="Smart Phrasing appended to prompt"></td></tr> </table>…and the run (Location Left edge, "a magical glowing whole in the ground, Keep the lighting the same") puts the glow on the left while leaving the rest of the scene intact:
Outpaint — extending the canvas
Switch Inpaint ▾ to Outpaint and the canvas becomes a direction picker:
- Hover near any edge of the preview — a glowing band shows the extension direction and amount (e.g.
➡ +256px). Click to extend that way. Or use the arrow buttons (← ↑ ↓ → / ⛶ All) on the Outpaint row if you prefer explicit controls. - Angelo pads the canvas, generates the new region at full denoise, and shows the result in a review overlay: ✓ Accept, 🎲 Try again (same extension, fresh seed), or ✕ Cancel / Esc. Nothing commits until you Accept — try-again and cancel are free.
- On Accept, the extended canvas appears on the main canvas instantly (the approved image is already in your browser — the commit happens in the background) and becomes the session's new base image — exactly like loading a new photo. Undo history resets, and Reset / the Restore brush / the
\compare key all anchor to the new canvas from here on. This is a deliberate design fact: outpainting is a structural decision you make early, then refine on top of — and it's why the review step exists.
Controls on the Outpaint row:
- Amount — pixels to extend by (snapped to /16 so any VAE lands on clean latent cells). The edge-hover band displays it live.
- Overlap — a feathered band reaching this many pixels into the existing image that gets redrawn along with the strip, so the seam blends instead of butting. Default 64.
The protect brush — keep the seam away from your subject. A generous Overlap blends beautifully, but if the band reaches into a subject near the frame edge (a car, a face), the model is allowed to redraw part of it — and partially-redrawable subjects at a generation boundary are how you get smeared extensions and accidental twins. So: drag in the canvas interior to paint a red protect region (brush size = Click R). Protected pixels are excluded from the overlap band — frozen bit-exact — while the rest of the seam still blends at full width. Run Overlap at 128 for a clean blend and paint over the car: best of both. The same gesture Photoshop's Content-Aware Fill uses for sampling exclusion. Protect circles survive Try-again (same extension, fresh seed) and clear via the ✕ Protect chip, on Accept, or when you leave Outpaint mode.
Painting right at the frame edge: hold Shift. The edge zone normally belongs to the extend-click — so to start a protect stroke on something flush against the border (where protection matters most), hold Shift and the brush wins everywhere: the glowing band is suppressed and your drag paints, all the way to the edge. Same convention as Detect's Shift touch-up brush. (Without Shift you can still get there by starting the stroke in the interior and dragging outward.)
How the prompt works in Outpaint (anti-duplication). Whether your main prompt affects an outpaint depends on exactly one thing — whether the clip input is wired:
- CLIP wired (the normal setup): your main positive prompt has zero effect on the extension. The outpaint encodes its own prompt: a direction-aware instruction ("Extend the image downward, continuing the scene and background naturally. Do not repeat or add new subjects.") plus your Area Prompt text only if that toggle is ON. Area Prompt off = the instruction alone is the entire conditioning, and the scene knowledge comes from the edge-band reference and the seam context instead. So loading a photo and immediately hitting ↓ extends it purely from the photo — whatever happens to be typed in your workflow's prompt boxes is a bystander.
- CLIP not wired: Angelo can't encode anything, so your main prompt flows through unchanged — and conditioning the new strip on "a red car on a road" is exactly what paints a second car into it. Wire the CLIP.
- Fine print: the main negative still falls through in both cases (unless you've typed an Area negative) — irrelevant at CFG 1 on distilled models like Klein, mildly relevant on CFG > 1 models.
Use the Area Prompt to describe the continuation ("empty coastal road, sea, sky"), never the subject.
Instruction order + live prompt preview. With Area Prompt on in Outpaint mode, an Order selector and a Final prompt preview appear under the text box. Instruction first (default) puts Angelo's extend-the-scene instruction ahead of your text; My text first flips it — worth trying when a model leans too hard on the instruction and under-weights your description (many models weight the start of a prompt more heavily). The preview shows the exact combined prompt the next extension will encode, live as you type, flip the order, or pick a direction — no guessing what's actually being sent.
Notes:
- On FLUX 2 Klein / Qwen-Image-Edit, the edge-adjacent band (~512px) of the existing image is injected as a reference — the texture and lighting to continue, without re-showing the model your subject (whole-image references invite edit models to reproduce the subject into the strip). ⛶ All uses the whole image, since everything borders the new space. Non-edit models ignore the reference and rely on the seam context — standard high-denoise fill.
- Corners handle themselves: every extension spans the full current edge, so extending right then down generates the bottom-right corner as part of the down-pass, with both neighbours as context. Extend in any order.
- The existing image stays bit-exact — the original latent is pasted back over the old region after the pad, so there's no VAE round-trip drift outside the seam band (and none at all under a protect region).
- ⛶ All extends all four sides at once — the zoom-out move.
- The preview will look smaller after an outpaint — the image got bigger but the node didn't, so the fit-to-node display scales everything down. The pixels are all there; check via right-click → open in new tab.
Detect — auto-segment with SAM 3 (optional)
Instead of painting or dragging a region, let SAM 3 find it for you by describing it. In Refine or Smart Inpaint, a 🔍 Detect row appears in the toolbar:
- Type a concept — "the face", "the red car", "her left hand" — and hit Detect; or
- Use the Quick Detect… dropdown of common subjects, grouped into People / Body / Clothing / Animals / Scene / Objects (face, hands, hair, clothing, sky, car, …). Picking one runs immediately and doesn't touch the text box.
Angelo highlights every match on the preview and you enter detect mode — nothing changes until you click. Click a highlight to edit that object; the others stay up so you can work through each one in turn without re-detecting. Edited candidates turn green (so you can track progress), the hovered one is yellow.
⚡ Fix All (in the floating detect panel) does the working-through for you: it edits every remaining (non-green) candidate in sequence, automatically — confirm, wait for the run to land, confirm the next — with your current settings applying to each one (Area Prompt, Xtra-Fine, seed control). The classic move: detect face in a group shot, set the Area Prompt to "detailed photorealistic face", hit Fix All, and watch every face get fixed at Xtra-Fine resolution while the candidates turn green one by one. The button becomes ■ Stop (n/total) while running — click it (or Cancel Detect / Esc) to stop after the in-flight candidate. Each fix is a separate history entry, so a single bad one can be individually undone, re-rolled, or Vary ×4'd afterwards.
Per mode, the confirmed detection becomes:
- Refine → the exact silhouette mask (a latent-space inpaint — see below).
- Smart Inpaint → the detection's bounding box as the rectangle.
- Smart Guided Inpaint → Detect is hidden (no mask there).
Your Area Prompt applies to whatever candidate you click (toggle it on in Refine; it's forced on in Smart Inpaint) — so you can detect "person", set a prompt, and apply it to each one in turn.
Detect-mode controls — a floating panel pins to the top-right (beside the Mode switch) while candidates are up:
- ✕ Cancel Detect, Esc, or Space leaves detect mode. Empty-space clicks do nothing, so you can't accidentally drop out mid-batch.
- ⚡ Fix All — auto-edit every remaining candidate in sequence (see above). Becomes ■ Stop (n/total) while running.
- A highlight-opacity slider — drag it down to fade the overlays and inspect the edges of what you just generated; candidates stay clickable, and it resets to full when you exit.
- Mask
[−] / [+]— grow / shrink every detected mask together (see "Tidying up a detection" below). - Conf (in the Detect row) tunes the match threshold (≈0.2–0.3 finds more / fainter matches).
Tidying up a detection. SAM is usually close but not perfect — two tools fix it without re-detecting:
- Mask
[−] / [+](in the floating detect panel) grows or shrinks every detected mask together, 2px at a time — handy when a silhouette is a touch tight or loose all over. The number shows the current offset; it resets on each new detect. - Touch-up brush (Refine only). Hold Shift and drag on the preview to add to the mask you start over (e.g. pull in a missed chunk of hair); hold Alt and drag to subtract — including punching a hole right in the middle. The brush size is your Click R, with a live green (add) / red (subtract) preview, and it works whether or not Paint Mode is on. Then click the candidate to apply the edited shape. (Brushing freezes that candidate's shape, so do any +/− grow first.)
While it works a "Loading SAM 3…" overlay covers the preview — the first Detect of a session builds and caches the model (several seconds), so this is just busy feedback rather than a frozen-looking canvas. It clears itself the moment results come back; if a request ever hangs, a ✕ on the overlay closes it manually. Anything you need to read or act on — no matches, a bad query, or the SAM 3 not installed prompt — shows as a persistent in-app message bar you dismiss yourself, never a toast that flashes past.
It runs in latent space. In standard Refine (Xtra-Fine off), the edit is a pure latent-space noise-mask inpaint — everything outside the silhouette stays bit-exact, with no VAE round-trip. SAM 3 runs on the decoded preview only to produce the shape, which is rasterised down into a latent mask. (Xtra-Fine and Smart Inpaint deliberately use the pixel-space VAE round-trip, as elsewhere.)
Enabling it (one-time, optional)
Detect needs Meta's SAM 3, which isn't on PyPI — so it's opt-in and not installed with the node (Angelo's core stays dependency-free). To enable it:
- Close ComfyUI.
- Run the installer in the
ComfyUI-Angelofolder:- Windows:
install_sam3_support.bat - macOS / Linux:
install_sam3_support.sh(bash install_sam3_support.sh)
- Windows:
- Start ComfyUI again.
The script installs SAM 3 + its dependencies into the same Python ComfyUI uses (it reads the interpreter path Angelo records on startup, so it works for portable, venv, or conda installs). The SAM 3 weights (sam3.pt, ~GB) download automatically on first Detect from a public mirror — no Hugging Face token needed. If sam3 isn't installed, the Detect button just tells you to run the script; everything else in Angelo keeps working.
Area Prompt (refine with a different prompt)
Connect a CLIP (the same one feeding your main positive/negative). Toggle Area Prompt on — a text box appears between the toolbar and the canvas. Type a prompt; refines encode it with the CLIP and use it instead of the main prompt. Toggle off → the box hides and refines revert to the main prompt. Hiding the box never loses what you typed (it lives in the node and reloads), and the cached image persists across the toggle.
While Area Prompt is on, the refine uses the Area text exclusively and never falls back to the main prompt — even when the Area text is left empty (empty = an empty positive prompt). This matters for the Smart edit modes: the main positive can carry a whole-image reference_latents (e.g. a Klein edit workflow's ReferenceLatent), and letting it leak in made an empty-Area-Prompt Smart Inpaint reproduce the entire scene into the region instead of editing just it.
Prompt Slots. The numbered buttons 1–6 in the Area Prompt header are six independent presets, each holding its own positive + negative text. Click a number to switch — the current text is stashed into its slot first, so nothing is lost — and the slots are saved with the workflow. Preset a few region prompts up front ("detailed photorealistic face", "ornate armour", "lush foliage"), then just click a slot and paint. Slots holding text show brighter digits than empty ones.
The box has a Pos/Neg toggle that switches which prompt you're editing. Negative is optional and falls back to the main negative when empty (matters only for CFG > 1; ignored at CFG=1 / distilled models like Klein — which is why it's tucked behind a toggle rather than a second always-visible box).
Both Smart modes force Area Prompt ON (it's the whole point there), and add an Insert Smart Phrasing button for the keep X the same constraints. Smart Guided Inpaint also adds the Location dropdown directly above the box.
Recommended: use denoise=0.7-0.9 for area-prompt refines in Refine mode. Lower values won't give the new prompt room to take effect against an image generated with a different prompt. (Both Smart modes lock denoise=1.0 since they're regenerating from scratch.)
Navigating the preview (zoom & pan)
The preview fits the node by default, but you can zoom in to work on fine detail:
| Action | Does | |---|---| | Mouse wheel | Zoom in / out, centered on the cursor (0.25×–8×) | | Middle-mouse hold + drag | Pan around | | Double middle-click, or F (cursor over node) | Reset back to fit |
When you zoom in (>1×), a small minimap appears in the bottom-right corner showing the whole image with a marker for your current viewport. Click-to-refine, paint, and rectangle-drag all keep working while zoomed — clicks land on the correct image pixel at any zoom — so you can zoom into a face, click to refine, and stay zoomed for the next click.
While you're zoomed or panned, the auto-fit is suspended so resizing the node won't snap your view back. A genuinely new image (or double-click reset) returns to fit; refining the same image keeps your zoom.
Fullscreen — the whole editor, full screen
Detail work on a node-sized preview is fiddly. Hit ⛶ Fullscreen (top-left of the Mode row) and the entire editor — toolbar, Area Prompt box, and canvas — pops out to fill your whole screen. It's not a read-only lightbox: everything works exactly as it does in the node — click-to-refine, Paint Mode, rectangle-drag, Outpaint, Detect, wheel-zoom, the lot — just on a canvas many times bigger, so precise clicks and brushwork are far easier.
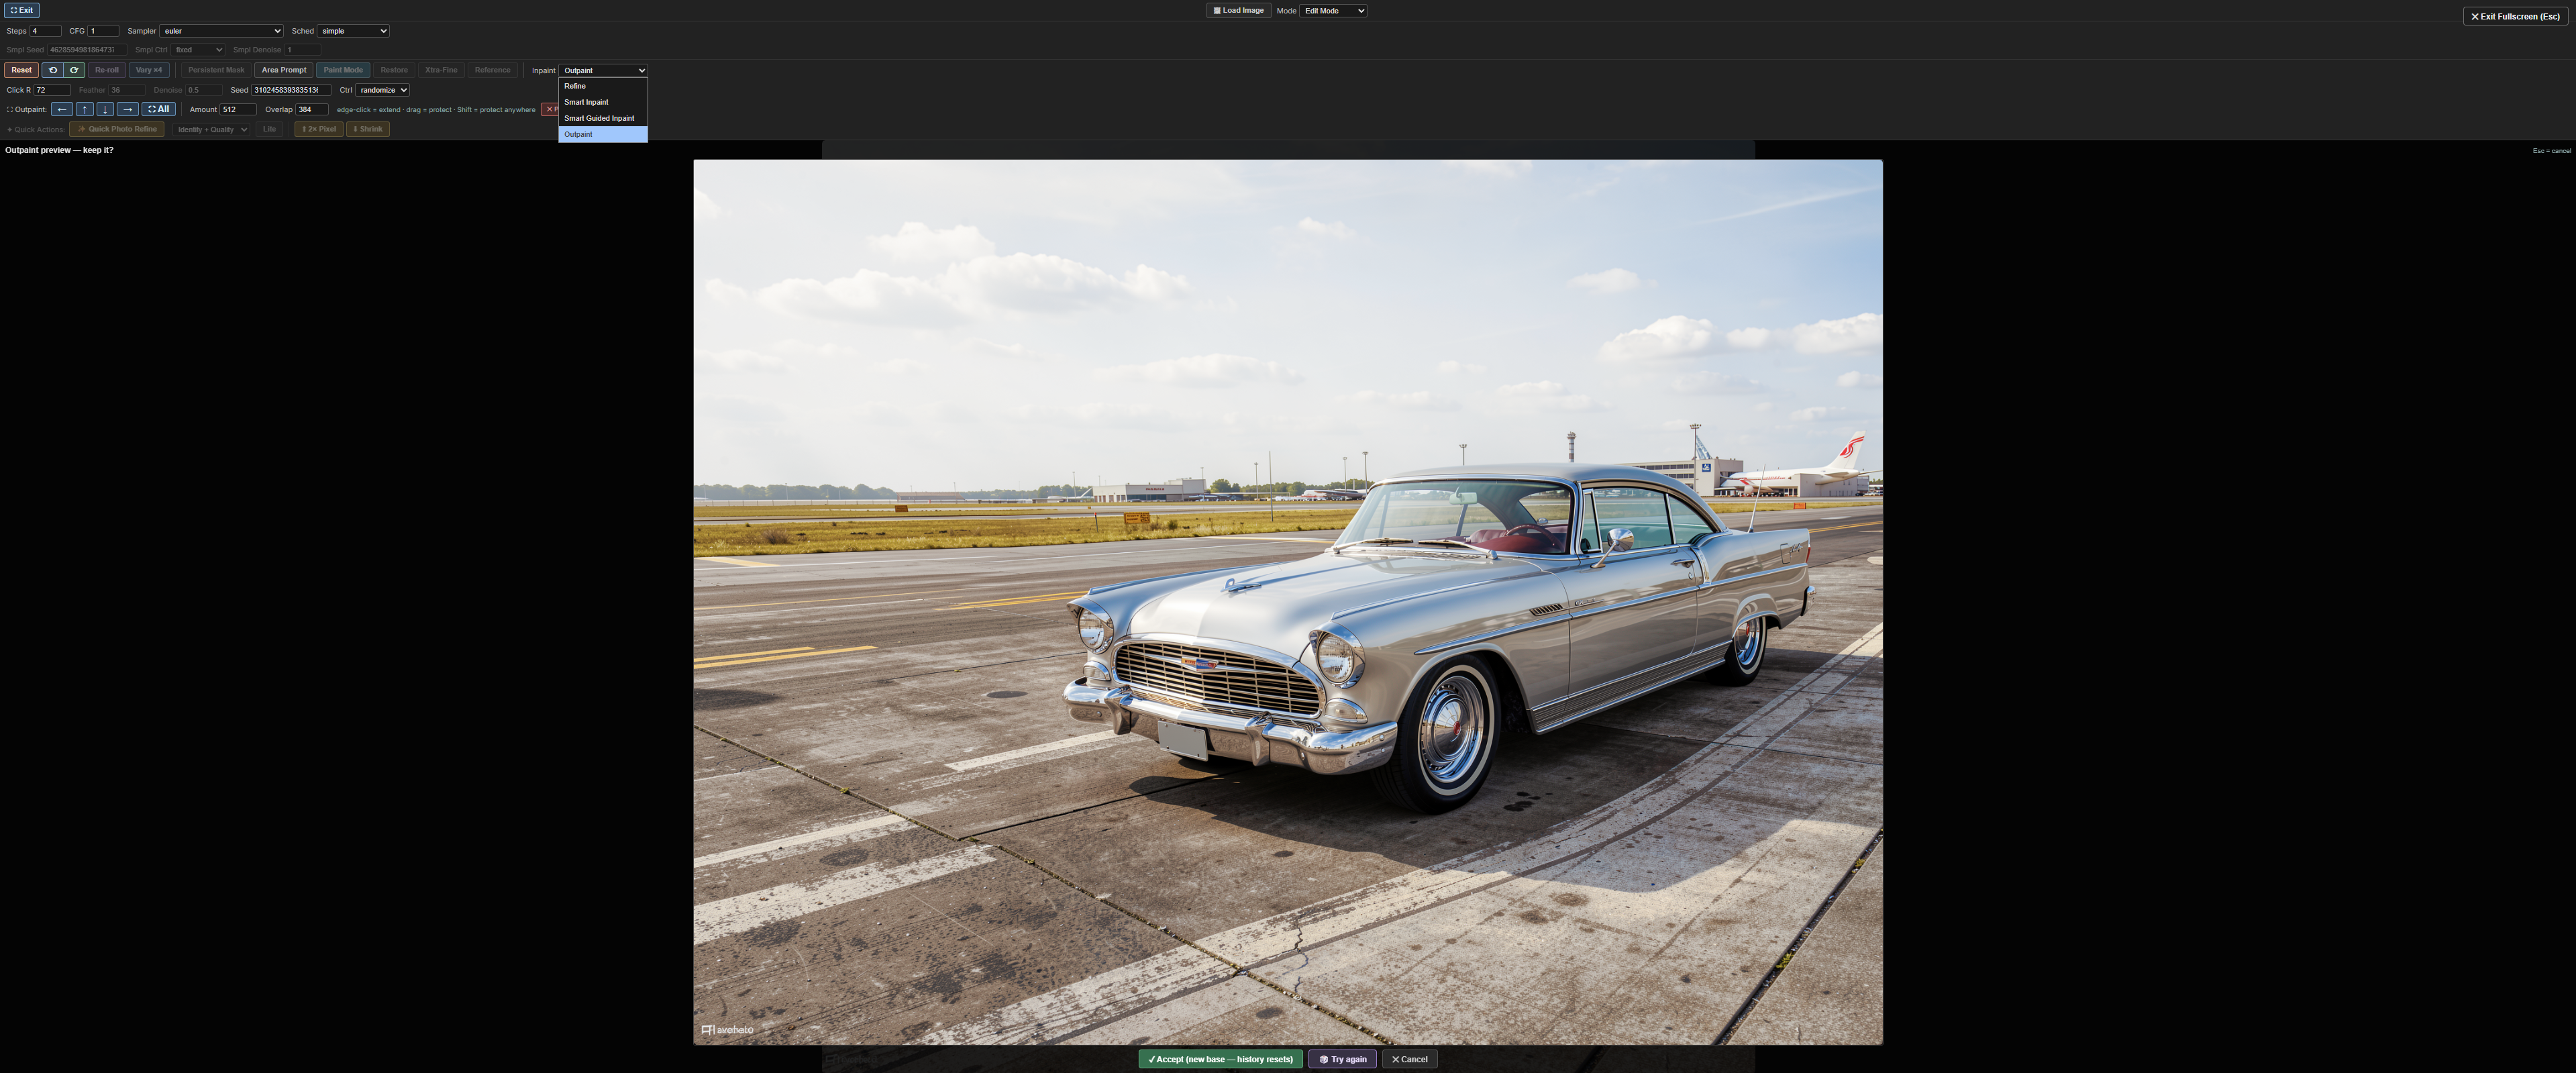
- Enter / exit: the ⛶ Fullscreen button toggles it. Once in, use the ✕ Exit Fullscreen button (top-right), press Esc, or click ⛶ Exit again.
- True browser fullscreen is requested too where the browser allows it, so even the browser chrome gets out of the way — but if it's refused, the overlay still fills the ComfyUI viewport, so the feature works regardless.
- Layered Esc: if a review is open (Outpaint / Vary ×4 / Detect candidates), the first Esc dismisses that and a second Esc leaves fullscreen — nothing gets closed out from under you.
- Works in both Sampler and Edit mode, and your zoom re-fits to the larger canvas on the way in and back out.
Keyboard shortcuts
When the cursor is hovering the preview canvas AND you're in Edit Mode, these keys adjust the matching toolbar values directly:
| Keys | Adjusts | Step | Convention |
|---|---|---|---|
| [ / ] | Click R | 4 px | Universal brush-size (Photoshop, Krita, Procreate) |
| { / } (shift+brackets) | Feather | 4 px | Photoshop brush hardness/softness |
| , / . | Denoise | 0.05 | < / > ordering on the same keys |
Plus one hold-key that works in any mode (not just Edit Mode):
| Key | Does | Convention |
|---|---|---|
| \ (hold) | Flash the session's original base image while held — release to return to the current state. A "BEFORE" badge confirms what you're looking at | Lightroom's before/after key |
| Esc | Leave ⛶ Fullscreen (after first dismissing any open Outpaint / Vary / Detect review) | Universal "get me out" |
The hover ring on the canvas updates live as you press [ / ], so you can size the brush against the actual image content. Shortcuts only fire while the cursor is on the canvas; move to the toolbar and they revert to ComfyUI's normal keybindings.
Tips
- Default denoise (0.5) is for in-place touch-ups. Bump to 0.85+ when you want a clear redo of the region (mandatory for Area Prompt; helpful for Xtra-Fine). Both Smart modes lock it to 1.0.
- Click R + Feather scaling. Feather ≈
Click R / 4works well as a starting point. - The preview always fits the node (until you zoom). Resize the node and the image scales to fit (letterboxed), so a portrait image no longer forces a giant tall node. Wheel-zoom + middle-drag to inspect detail — see "Navigating the preview".
- Lanczos is the default for Method. For smooth content (faces, skin), try bilinear too — sometimes preferable on very soft subjects.
- The refine controls grey out in Sampler Mode (and the base-gen seed row greys in Edit Mode) so you can see at a glance which mode you're in.
- Lock-on-fixed seed semantics. Switching to
fixedalways also restores the seed widget to the value Python actually used at the last run — so "fixed" always means "the seed that produced the current canvas". Resetdiscards undo history too. Hit Undo first if you just want to roll back one refine.- Hold
\before you commit. A quick before/after flash tells you whether the last few refines actually improved things — and whether the Restore brush should claw any of it back. - Prompt Slots + Detect is a production line. Preset your region prompts in slots 1–6, detect "person", then work through the candidates switching slots as you go — no retyping between regions. When every candidate gets the same prompt, skip the manual pass entirely and hit ⚡ Fix All.
- Fix All for the broad pass, Vary ×4 for the holdout. Auto-fix every face in the shot, then Vary the one stubborn candidate that didn't land — four fresh takes, click the best.
- Vary ×4 beats mashing Re-roll whenever judging takes longer than generating: on a 4-step model the four candidates cost a few seconds total, and comparing them side-by-side is faster than flipping through sequential re-rolls from memory.
Honest limits
- In-process state. Refinements live in the running ComfyUI process. Restart = cache cleared. Workflow JSON saves widget values but not the cached refined latent.
- VAE round-trip cost in Xtra-Fine. ~1.5-2 seconds per click on a 5090 for FLUX 2 Klein. Trade-off for the resolution boost; OFF mode stays fast.
- Crop+upscale is bounded by the model's training distribution. Very small painted regions even at 8× upscale won't suddenly look like trained-resolution content. Paint wider so the crop carries more surrounding context.
- One Angelo node per ComfyUI instance is sensible. Multiple parallel Angelo nodes would share the global queue hook and may interact in surprising ways under Persistent Mask.
- No multi-user safety. Don't use this on a shared ComfyUI server expecting per-user state isolation.
Compatibility
- ComfyUI: any reasonably modern version (the JS uses standard ComfyUI extension APIs).
- Models: any sampler-compatible model. Defaults are tuned for FLUX 2 Klein 9B distilled, but works with FLUX 1, FLUX 2 Dev, SDXL, SD 1.5, etc. — change
steps/cfg/sampler_name/schedulerto match your model. - VAE: FLUX 2 (16× downscale), FLUX 1 / SDXL / SD 1.5 (8× downscale) handled automatically. Exotic VAEs may need a small code change.
- GPU: any CUDA GPU that runs your base model. Angelo adds minimal overhead.
Credits + contact
Built by Peter Neill (shootthesound).
Bug reports, feature requests, and "this changed how I work" stories all welcome via GitHub issues.
If Angelo saves you time, you can support development here:
<a href="https://buymeacoffee.com/lorasandlenses"><img src="https://img.shields.io/badge/Buy%20me%20a%20coffee-FFDD00?style=for-the-badge&logo=buy-me-a-coffee&logoColor=black" alt="Buy Me A Coffee"></a>
License
MIT.
Run ComfyUI workflows without the setup
No installs, no CUDA version roulette, no GPU sitting idle on your bill. Bring a workflow and run it in the browser.